This is what you will be making.
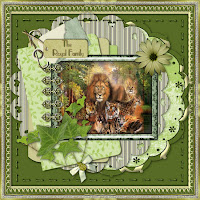
Header Tutorial
This tutorial was written by me. Any other similar to this is coincidence.
Supplies needed:
PSP 8 (My Preference) But should be able to be done in any version.
Get a older version for free here:
Ulead Effects Filter Art texture plug-in here:
Filters Unlimited here:
Scrap Kit by Scrappy Days (included in the supply file).
All Misc elements crafted by me:
These include the The Mist, Paper Clip, 2 Doilies, Gold Overlay, Picture Frame,
Journal Pages & 2 Tags.
They are FTU--Be my guest.
If possible please credit me. "SkinnizScrapz&Stuff".
Thank you Scrappy for your kit.
Tube or graphic of choice.
A Gold Pattern included
I used EastSide Font included
I also included a color pallette.
I have included my misted image.
Supplies Here:
Scrap Kit Here:
Background Color #566B24
Foreground Color #CCC88F
Open Blank Canvas 700 x 700 (resize later)
Fill with BG Color
Open Gold Overlay-Copy-Paste as new layer
Add drop shadow
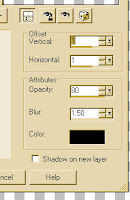
H/V 1 opacity 80 blur 1.5 color black
Open Doilie 01 copy/paste as new layer
Move to lower right of canvas
Open Doilie 02 copy/paste as new layer
Move to upper left of canvas
Open Scrap Kit by Fae
Copy Straight Stitches
Paste as new layer
Move to upper top of canvas
layer duplicate
image flip
merge the 2 layers
layer duplicate
image rotate 90
make edges meet
erase any extra edges for a smooth connect.
merge the 2 layers
Use deform tool to stretch stitiches to inside edge of gold overlay
Make sure stitch layer is top layer
add a drop shadow
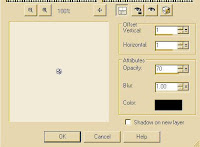
H/V -1 Opacity 70 Blur 1 color black
Click on doilie layers add drop shadow
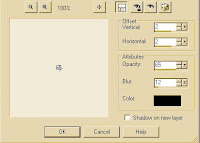
H/V 2 Opacity 65 Blur 12.0 Color Black
Open Tab Pagez
Resize all by 70%
Copy/Paste top page as new layer
Image rotate left 15
Move to upper left
Copy/Paste 2nd tab as new layer
move below top page align with top page
Copy/Paste 3rd tab as new layer
move below page 2
align with top pages
add drop shadow to each page
same as before
Open Frame
Copy as new image
Click inside frame
Selections Modify Expand 5
Add a new layer Paste your tube or graphic into selection
Select none Move below frame layer.
Merge all
Copy/paste onto canvas.
Resize 70%
Move into center.
Add drop shadow
Open Scrap Kit
Copy Clasps
Paste as new layer
Move to place on frame
Add Drop Shadow
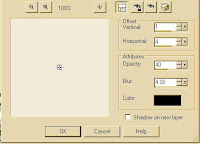
V 1 H 4 Opacity 40 Blur 4 Color Black
Merge Clasp Layer & Frame Layer
From Scrap Kit Copy Flower
Paste as new Layer
Move to right Corner of frame
Colorize if desired.
I used Manual Color Balance
Using white as Source & #CCC88F as Target
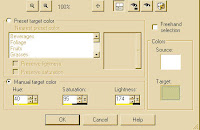
add drop shadow
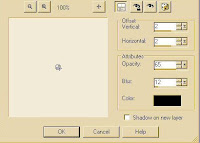
V/H 2 Opacity 65 Blur 12 Color Black
From Scrap Kit Open Large Ivy
Paste as New Layer
Duplicate layer
Image Mirror
Use deform tool & turn Ivy to 9:00
Move ontop of Other Ivy layer.
Merge the ivy layers
From Scrap Kit open Bow Paste as new layer.
Image rotate left 45
Move over ivy stems
Colorize as before
From Scrap kit add gem of choice.
Move over center of bow
Merge Bow & Gem
Add drop shadow to bow & Ivy layers
Merge bow & Ivy layer
Add embellishments as you desire.
Add watermark/copyright info
Merge all layers
Select all
Selections Modify 30
Select invert
Effect Inner Bevel
Use these settings
2 - 31 - 35 - 4 - 2 - 37 - 315 - 30 - 53 - Color White
Select None
Add 2 Pt border white select fill with gold pattern.
Keep selected add filter Ulead art texture

Click ok
Select None
Add 2 pt border #566B24
Add 2 Pt border white select fill with gold pattern.
Keep selected add filter Ulead art texture
Click ok
Select None
Image add border 10 #CCC88F
Select
Add Filters Unlimited Paper textures canvas fine
Click apply
Effects edge effects enhance
Apply inner bevel
Select invert
Add cutout
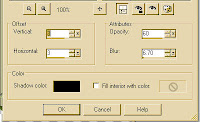
V/H 30 Opacity 60 Blur 6.7 Color Black
Repeat changing V/H to -3
Select none.
Add 2 Pt border white select fill with gold pattern.
Keep selected add filter Ulead art texture
Click ok
Select None
Add 2 pt border #566B24
Add 2 Pt border white select fill with gold pattern.
Keep selected add filter Ulead art texture
Click ok
Select None
Resize to 650 pixels.
Save as ,jpeg. I compress at 25.
You're done.
If you would like the tutorial for the background click here:
Hope you enjoyed this tutorial & that it was easy to follow.
Please credit: Skinni @ SkinnizStatzScrapz&Stuff.yahoogroups.com
Feel free to email me if you have questions
Skinniminni@gmail.com
HOME
1 comment:
Thank you so much for this Freebie. I want to let you know that I posted a link to your blog in CBH Digital Scrapbooking Freebies, under the Page 9 post on Dec. 13, 2009. Thanks again.
Post a Comment